

On this page
Connect your Shopify store
Two ways to join your store to Orzoni: with us on a 15-minute call, or yourself in about ten minutes with a picture of every step.
9 minute read
Before you begin
Connecting a store lets Orzoni read what it lists and keep its stock in step with Tally's. You need three things first.
- Your books are open in Orzoni. The Tally connector is installed and the computer is linked. If not, start with Connect Tally and link the computer.
- You may change stock in Orzoni. The owner, an admin, an accountant and a stock keeper can. Turning counts on later, and taking the store off, need whoever holds Business settings.
- You own the store on Shopify, or you are staff there with the App development permission. A collaborator account cannot do this.
A business connects one store.
Choose how to connect
In Orzoni, open Connectors, then Shopify.
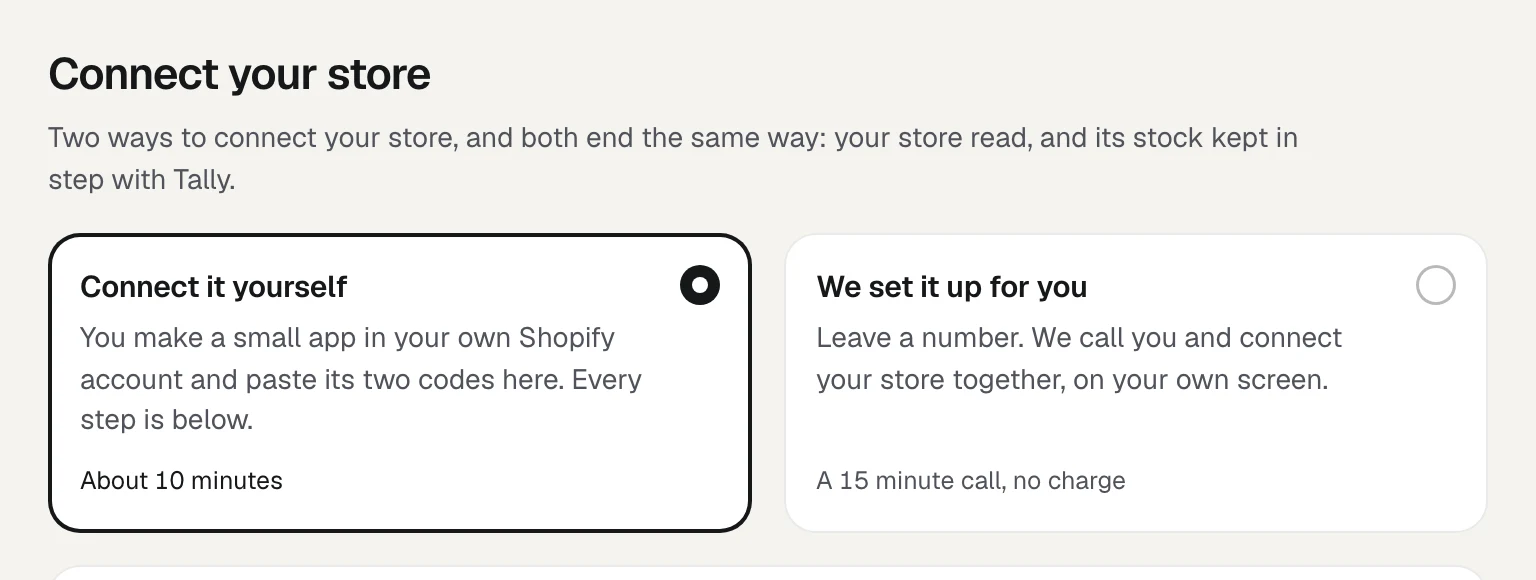
| Connect it yourself | We set it up for you | |
|---|---|---|
| What you do | Make a small app in your Shopify account and paste its two codes into Orzoni | Leave your mobile number. We call, and you press while we guide |
| Time | About 10 minutes | A call of about 15 minutes |
| Cost | Nothing | Nothing |
| Good for | Anyone comfortable in the Shopify admin | Anyone who would rather be walked through it |
Both end the same way: your store is read, and nothing on it is changed until you say so.
Connect it yourself
Keep Orzoni open in one tab and your Shopify admin in another. The same five steps are on the screen in Orzoni, with the boxes to fill in.
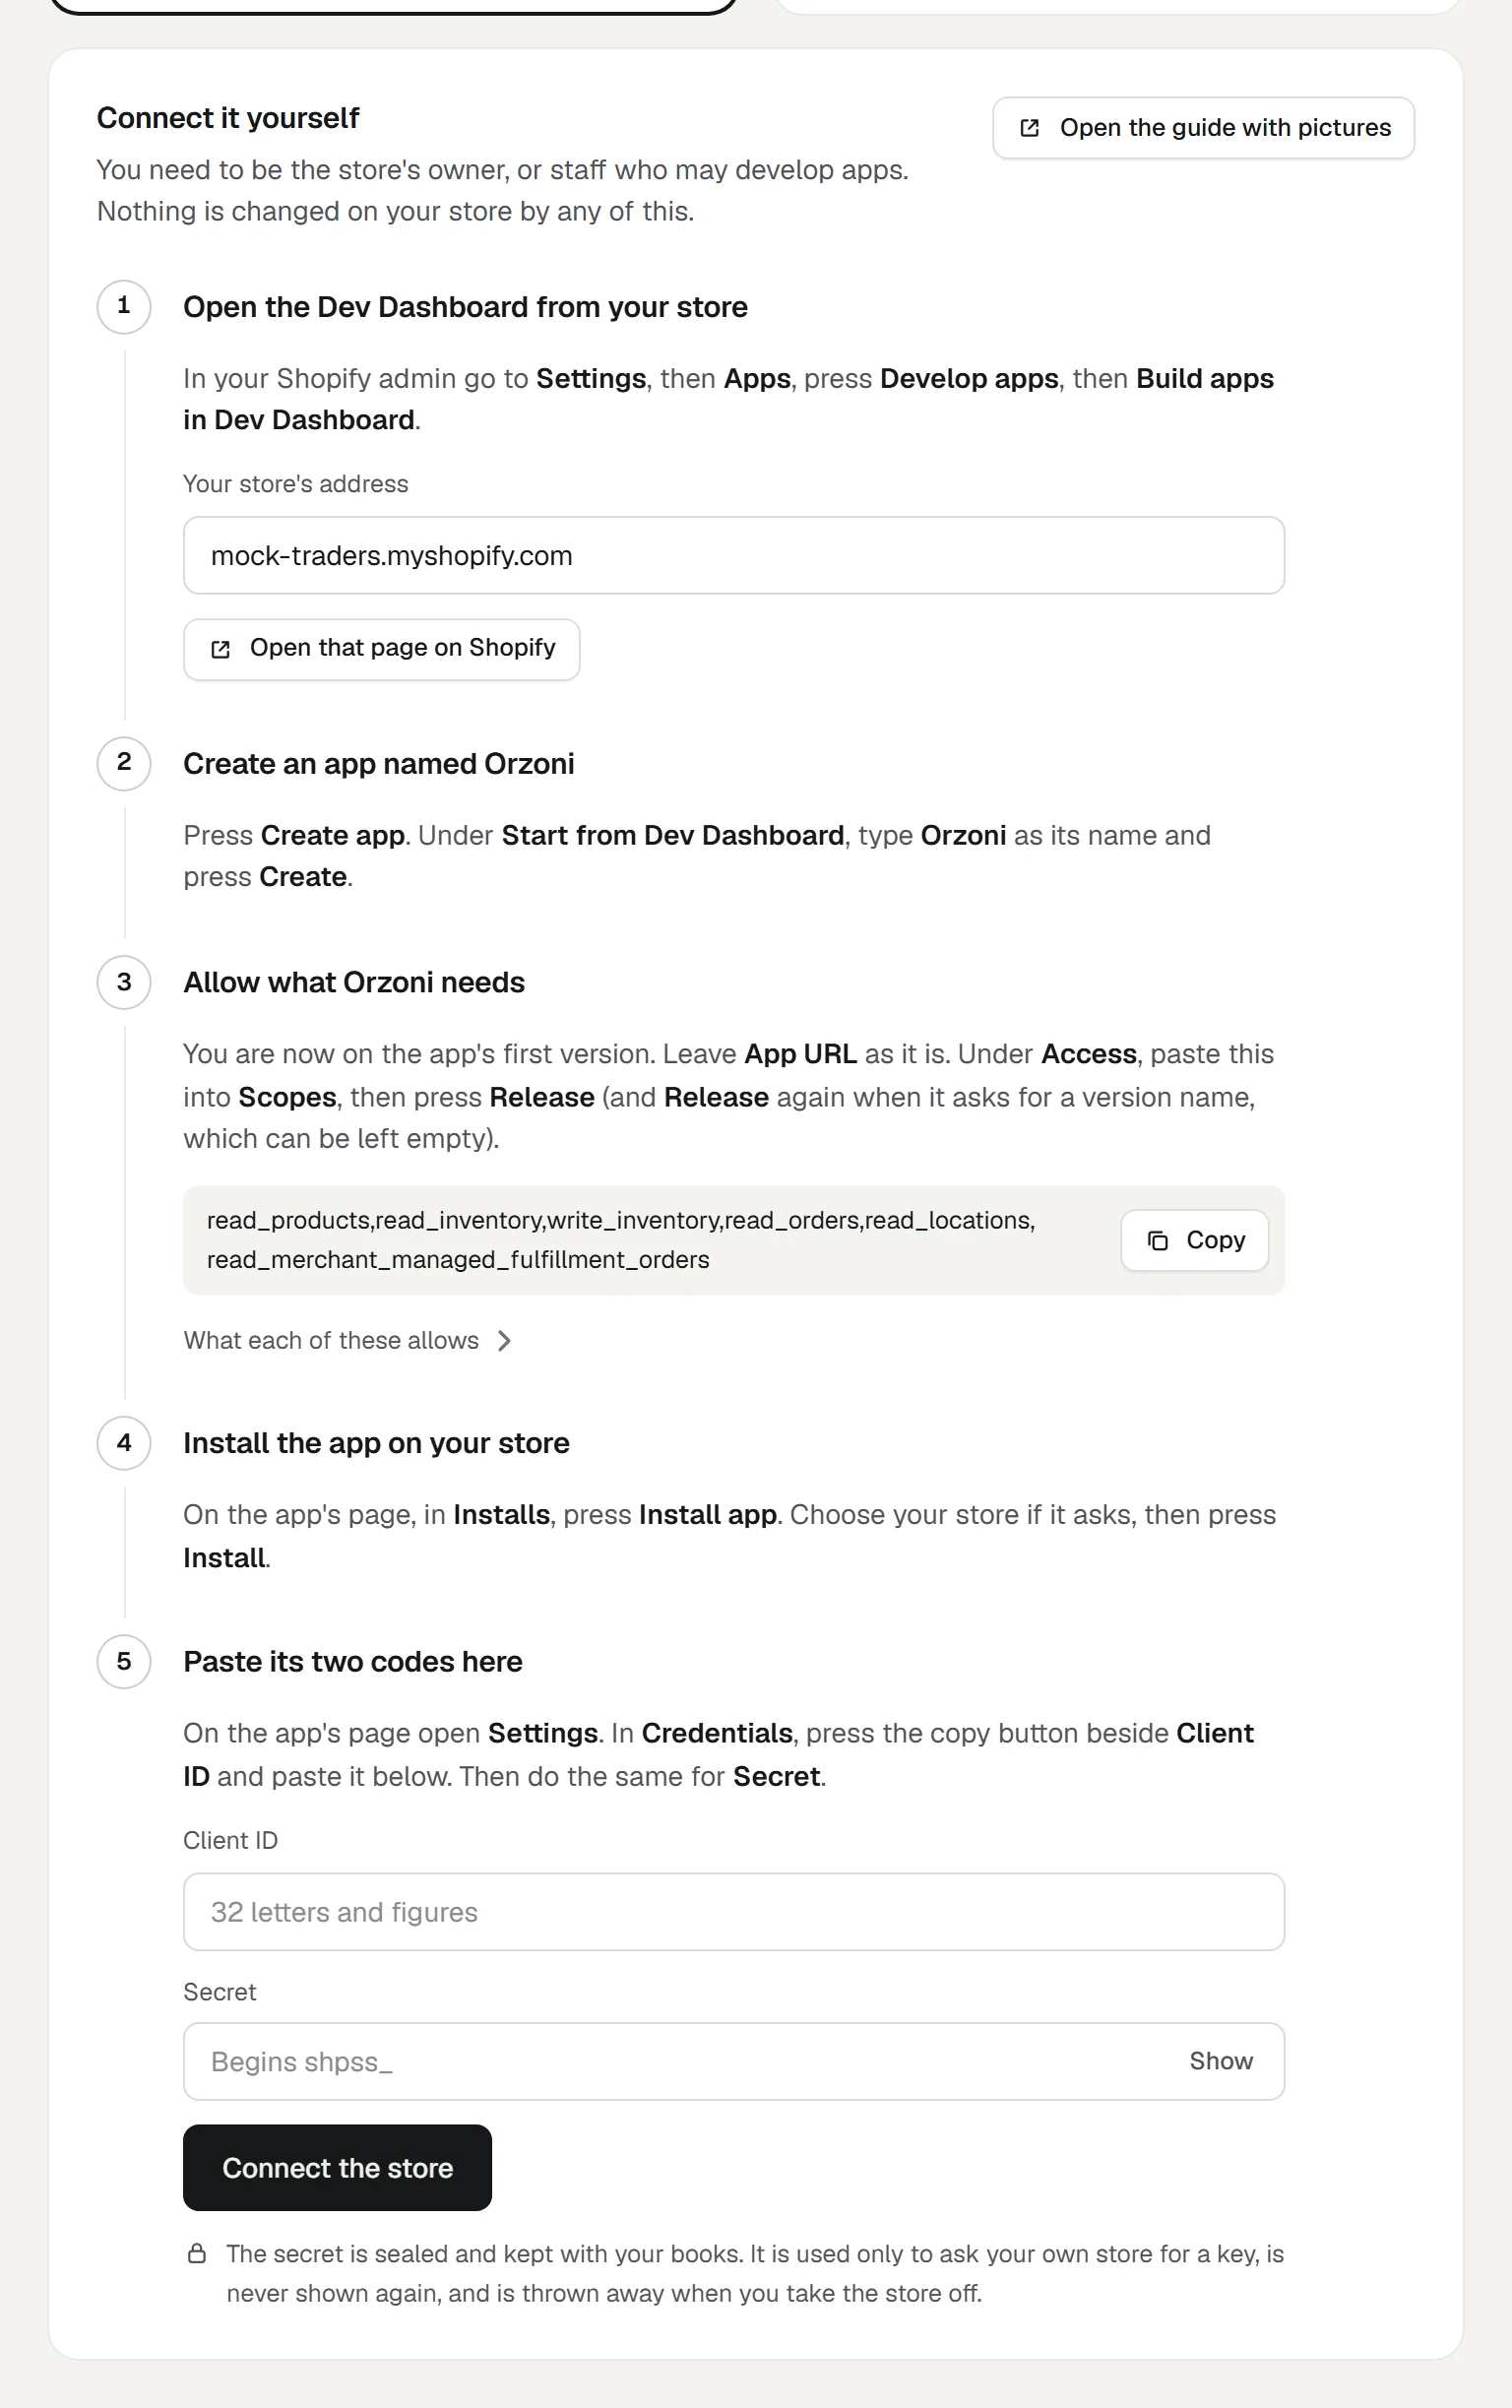
Step 1: open the Dev Dashboard from your store
- In your Shopify admin, open Settings (bottom left).
- Choose Apps.
- Press Develop apps.
- Press Build apps in Dev Dashboard. The Dev Dashboard opens in a new tab.
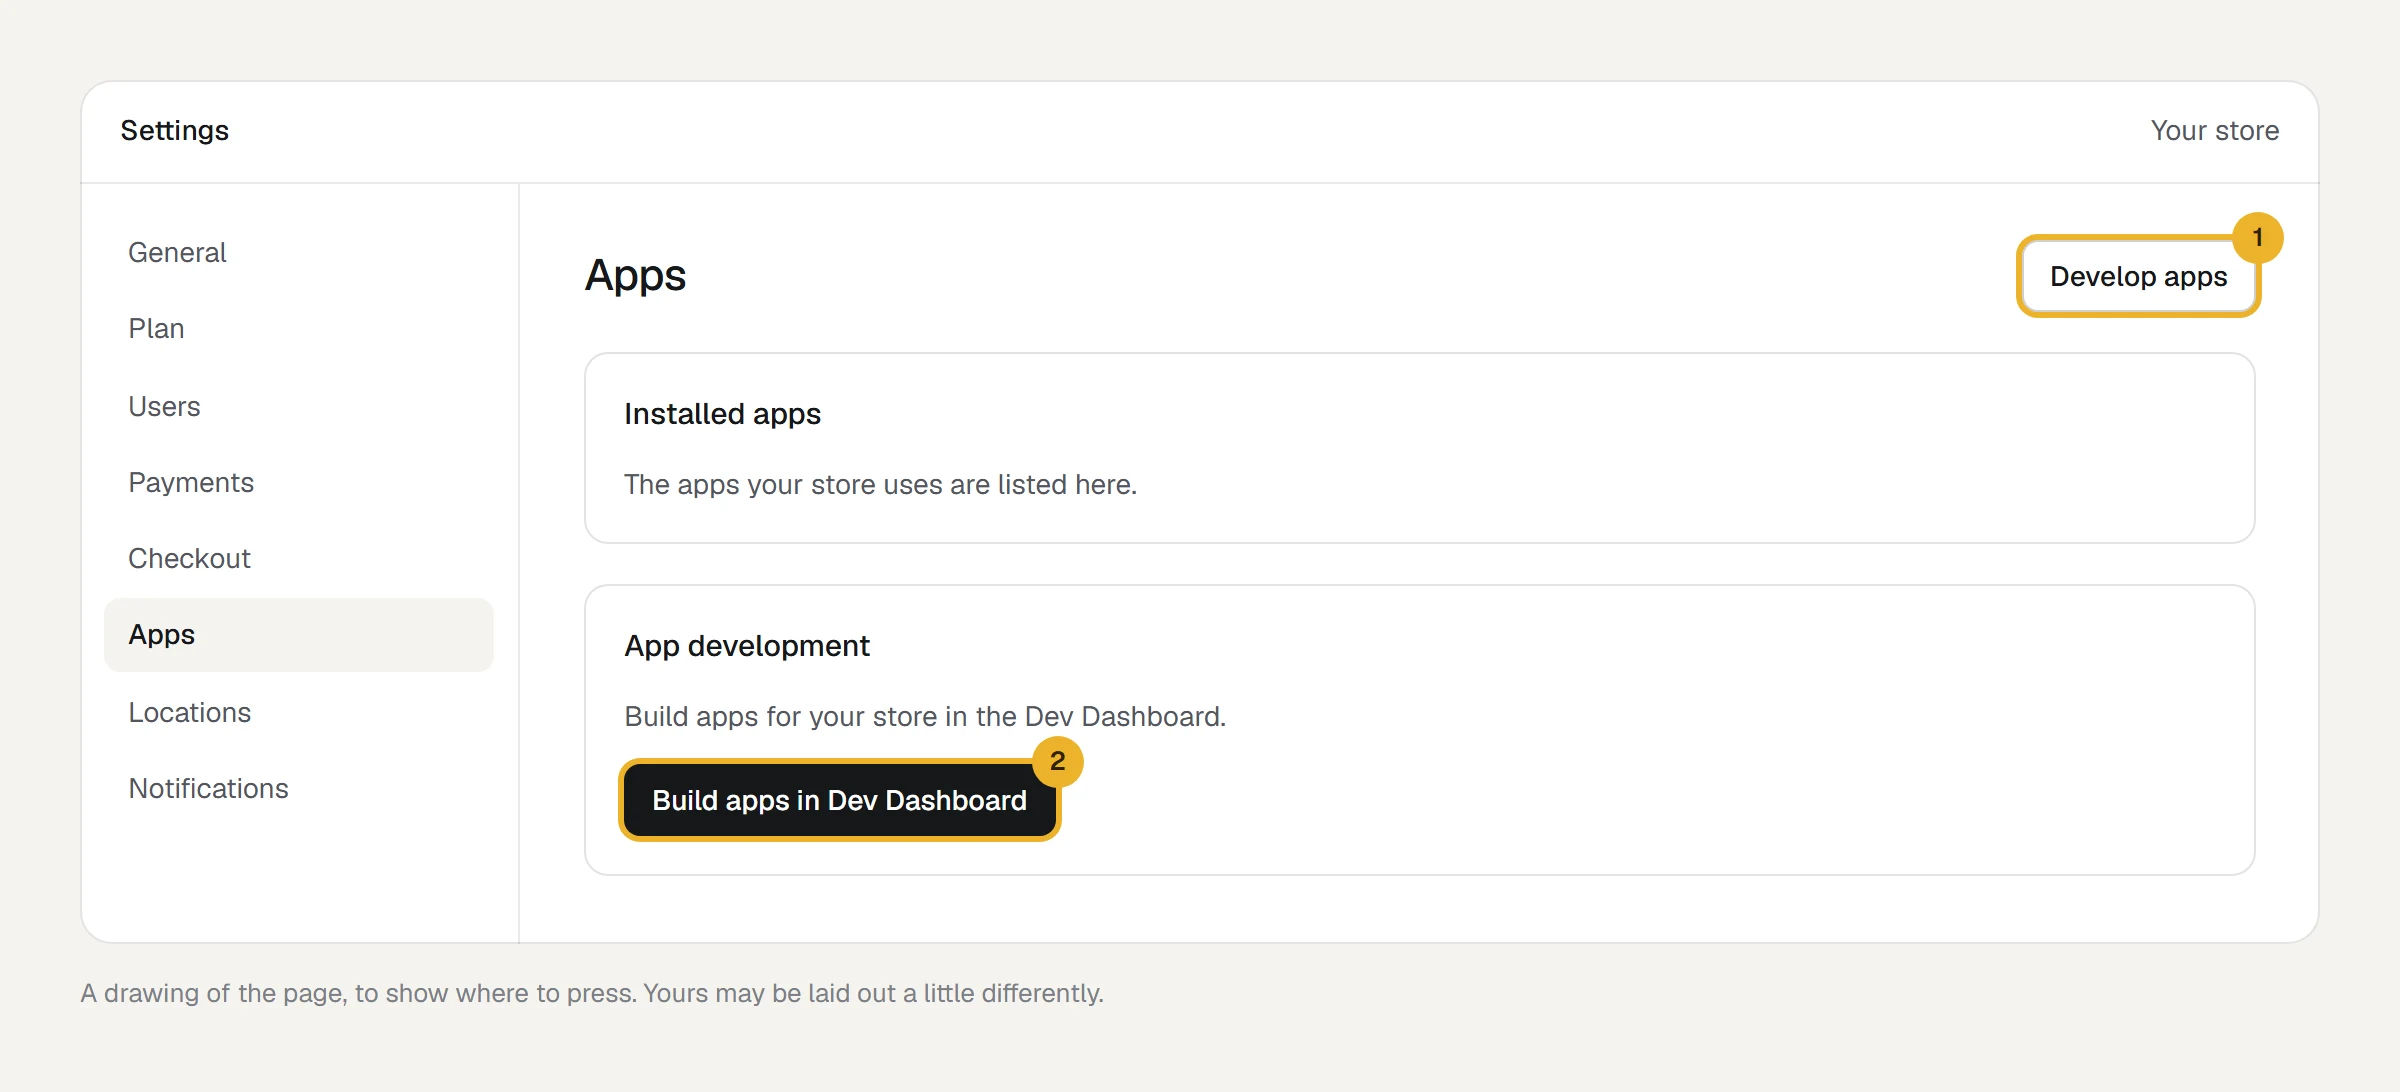
If you do not see Develop apps, you are signed in as someone who may not develop apps. Sign in as the store's owner, or ask the owner to give you the App development permission under Settings, Users.
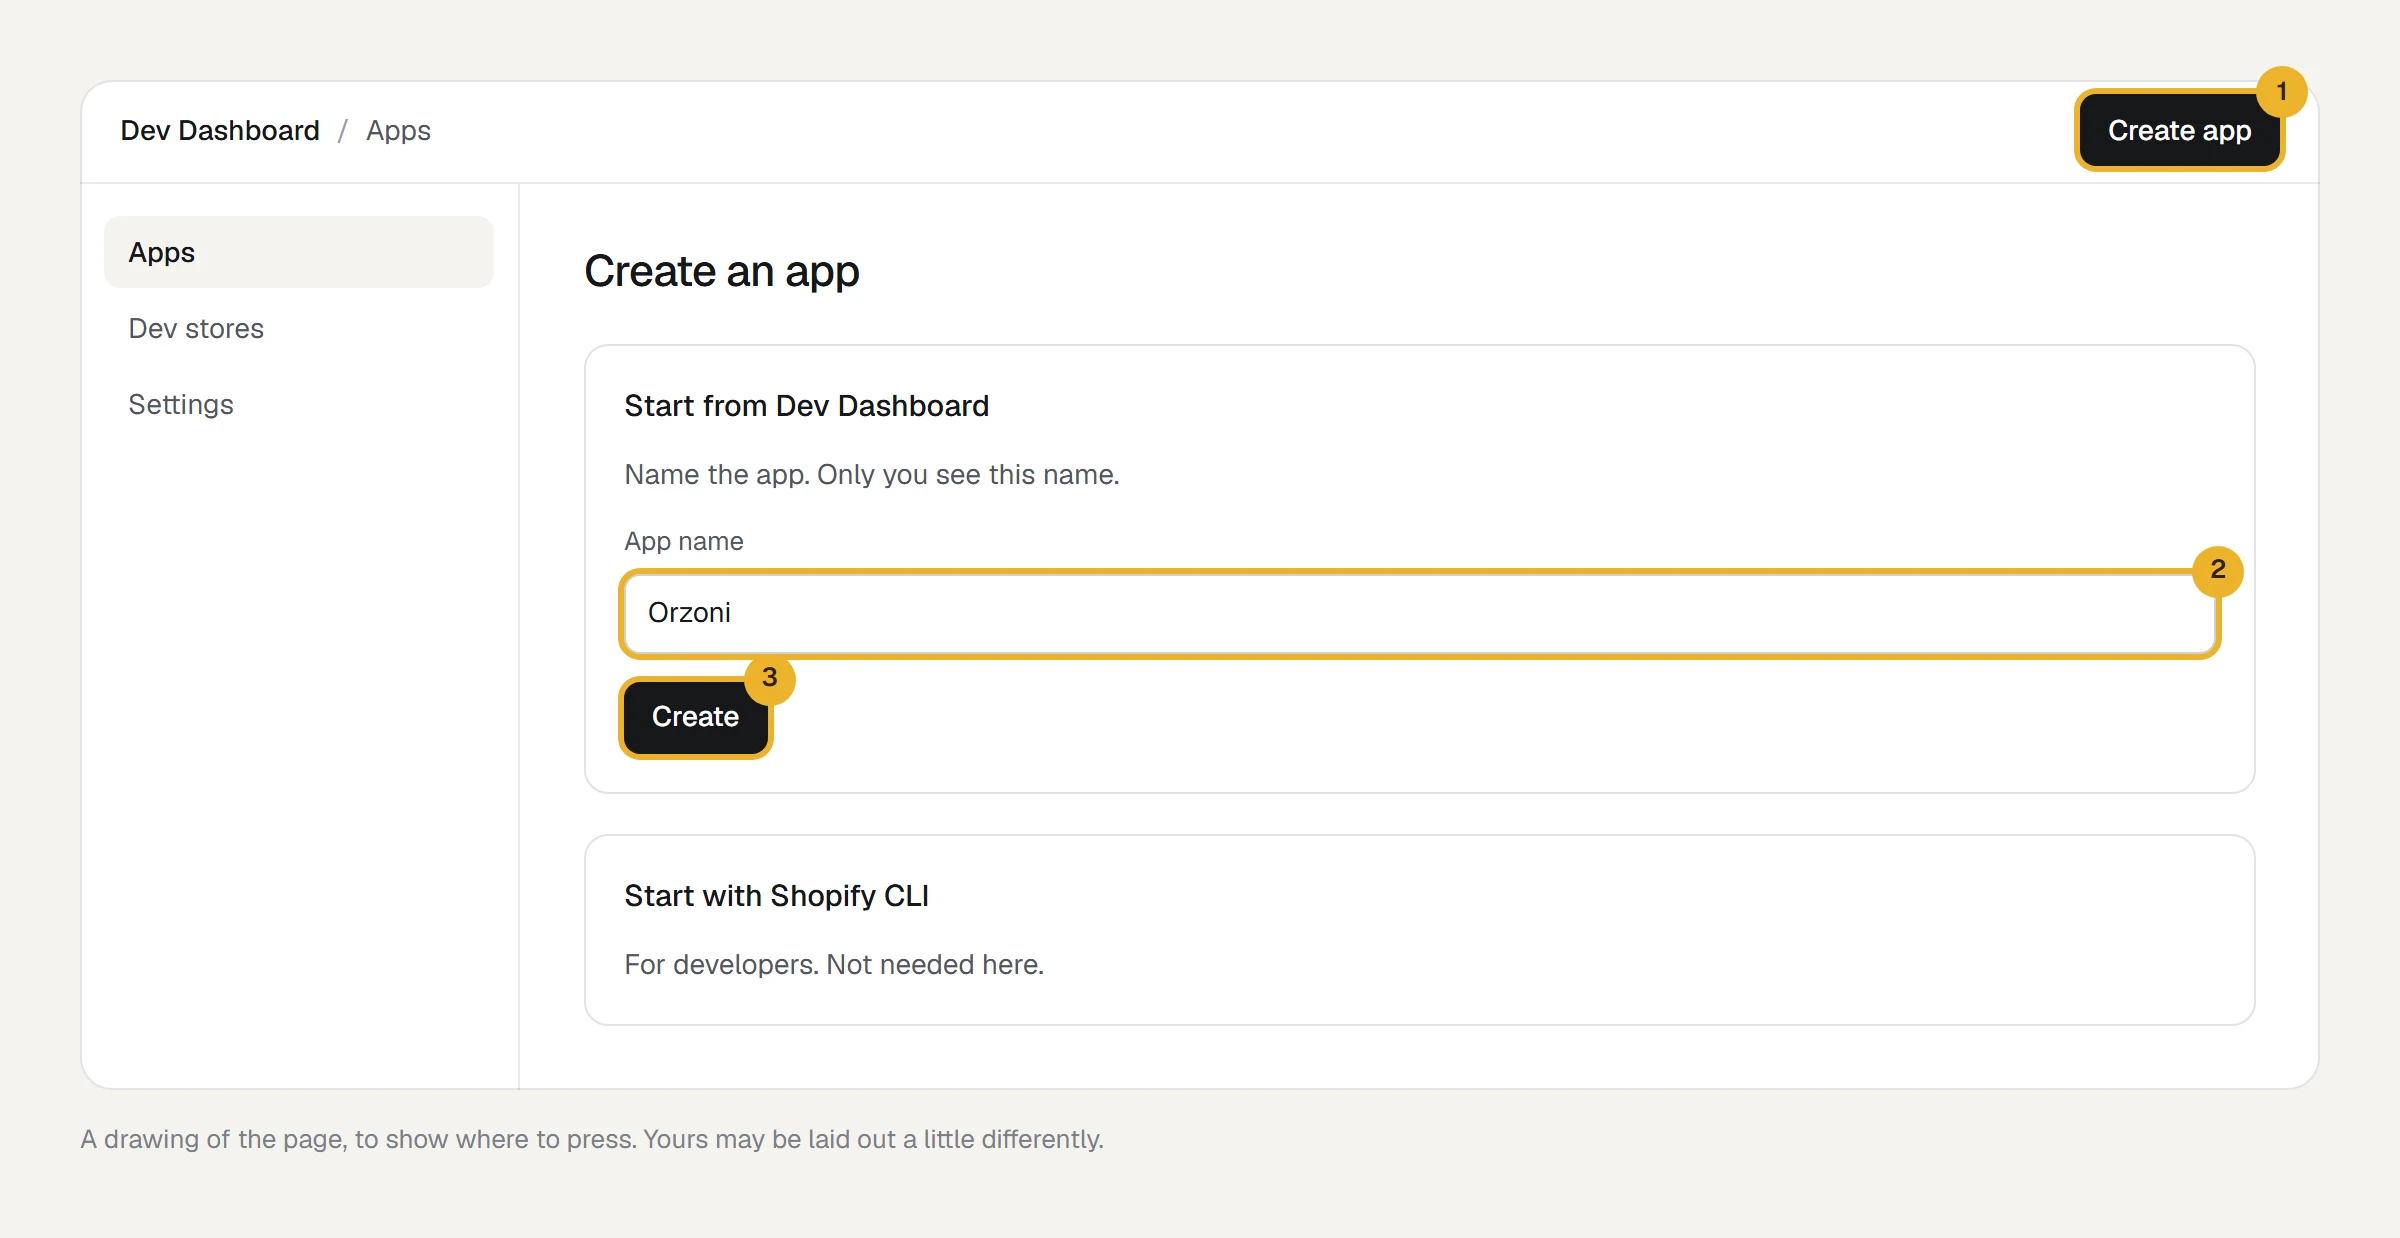
Step 2: create an app named Orzoni
- In the Dev Dashboard, press Create app (top right).
- Under Start from Dev Dashboard, type
Orzonias the app's name. Only you see this name. - Press Create.
Step 3: allow what Orzoni needs
The app opens on its first version. A version says what the app may read and change.
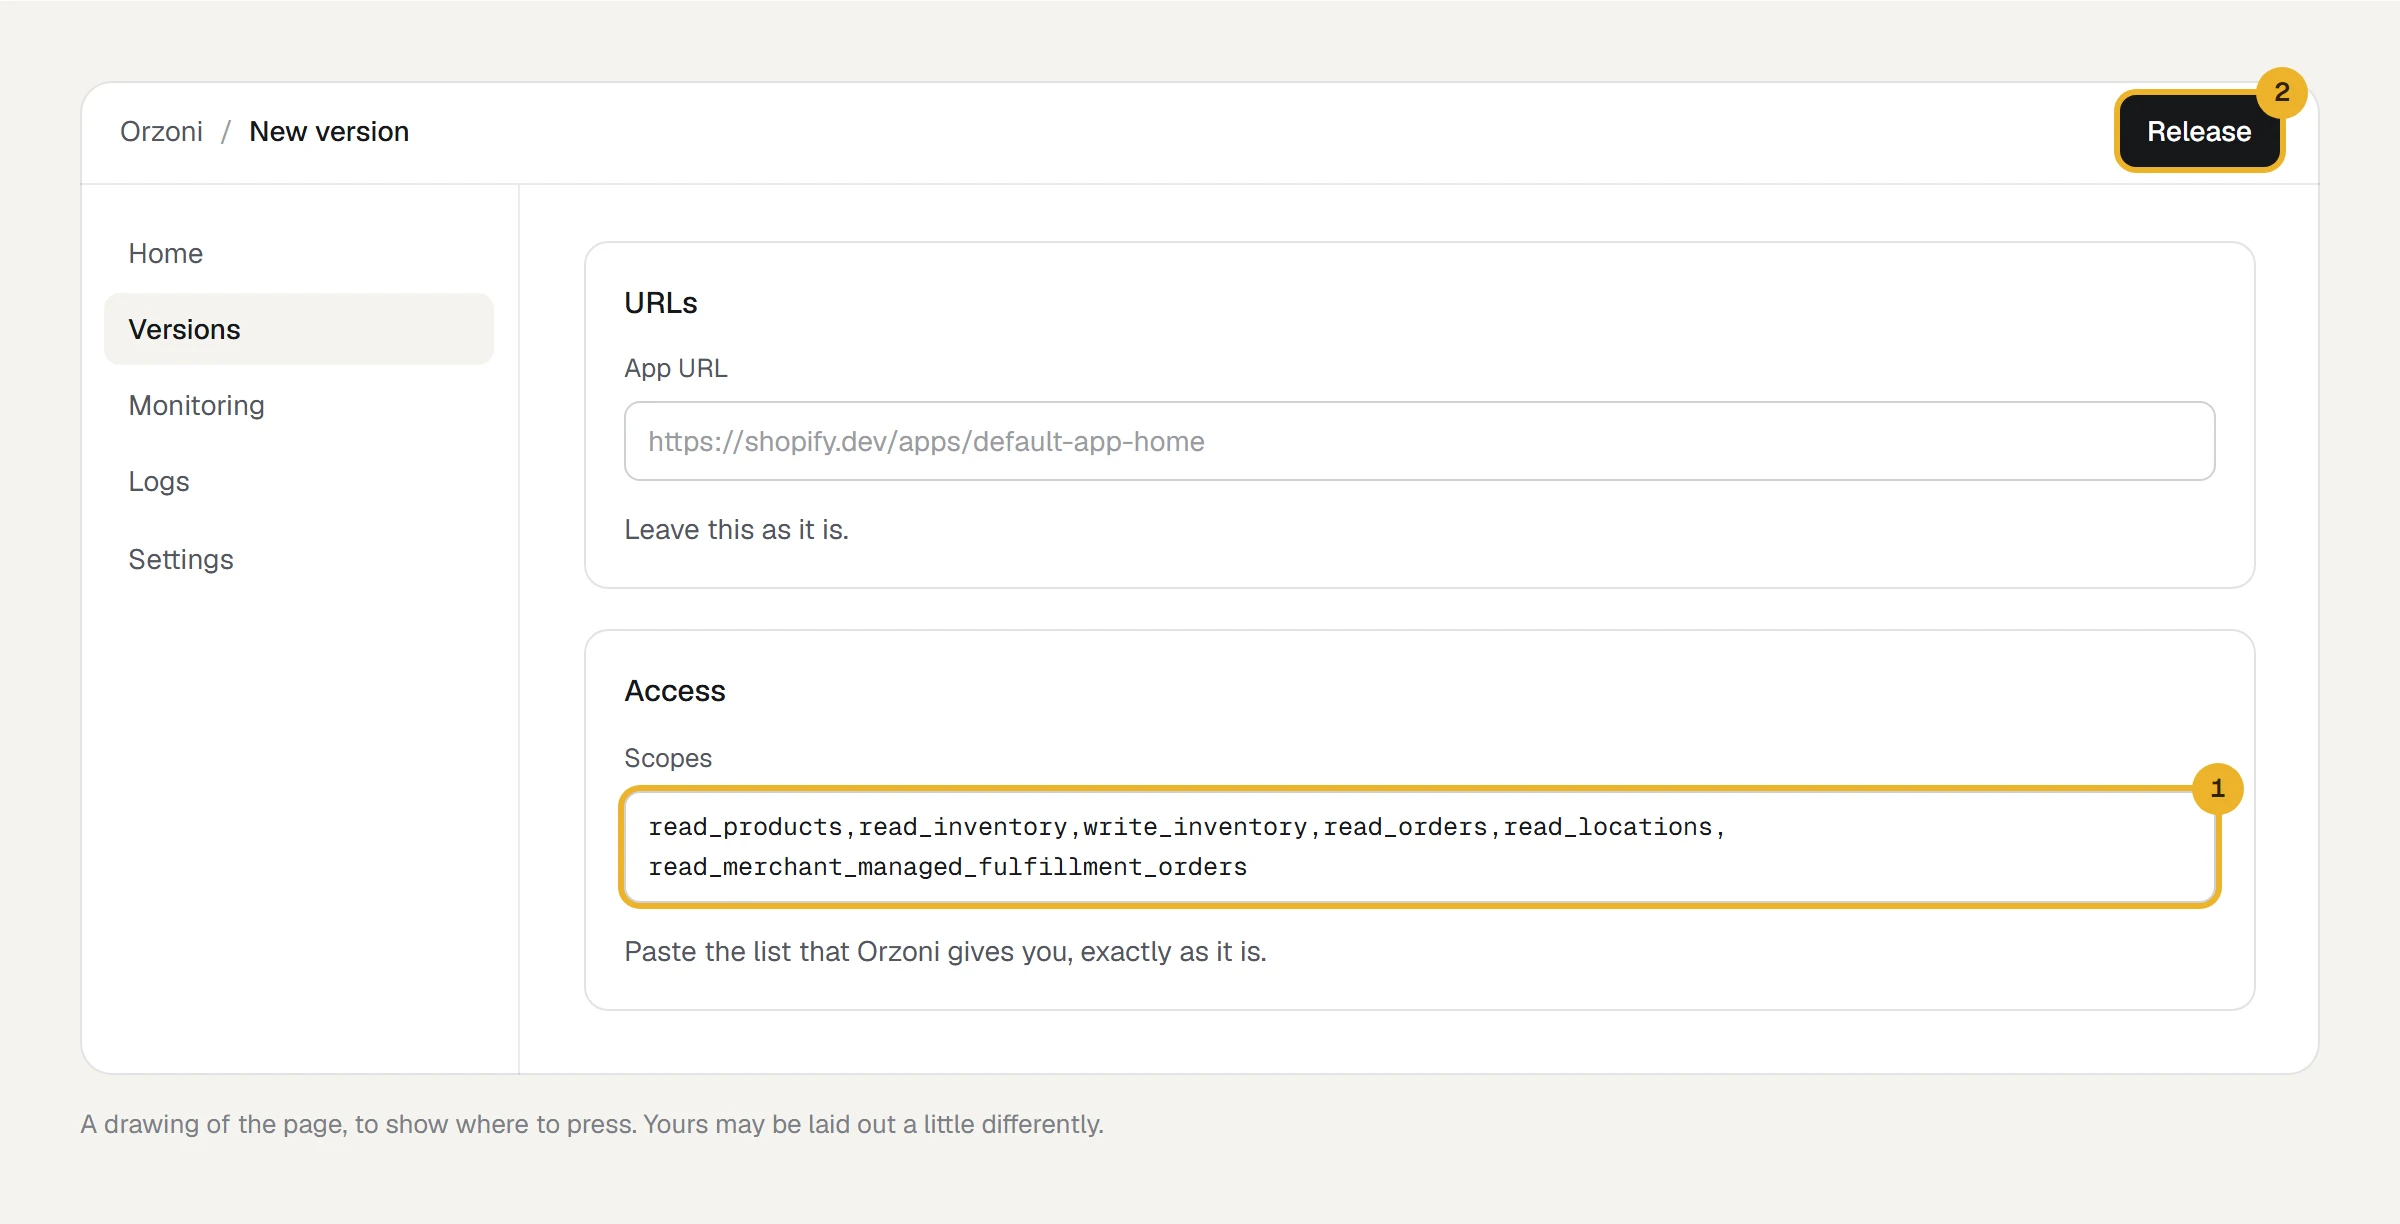
- Leave App URL as it is.
- Leave Webhooks API version as it is.
In Orzoni, at step 3, press Copy. It copies this list:
read_products,read_inventory,write_inventory,read_orders,read_locations,read_merchant_managed_fulfillment_orders- Back in the Dev Dashboard, under Access, paste the list into Scopes.
- Press Release. It asks for a version name and a message: both can be left empty. Press Release again.
What each part of the list allows:
| In the list | What it allows | Why Orzoni needs it |
|---|---|---|
read_products, read_inventory | Reading what your store lists and the count it holds for each | To set them beside your items in Tally |
write_inventory | Changing those counts | To set them from Tally's. This is the only thing Orzoni ever changes on your store |
read_orders | Reading orders | To take an order off the count at once, before its bill is made. No buyer's name, address, phone or email is read |
read_locations, read_merchant_managed_fulfillment_orders | Reading where your store keeps stock, and which place an order leaves from | To keep each location's count right |
Step 4: install the app on your store
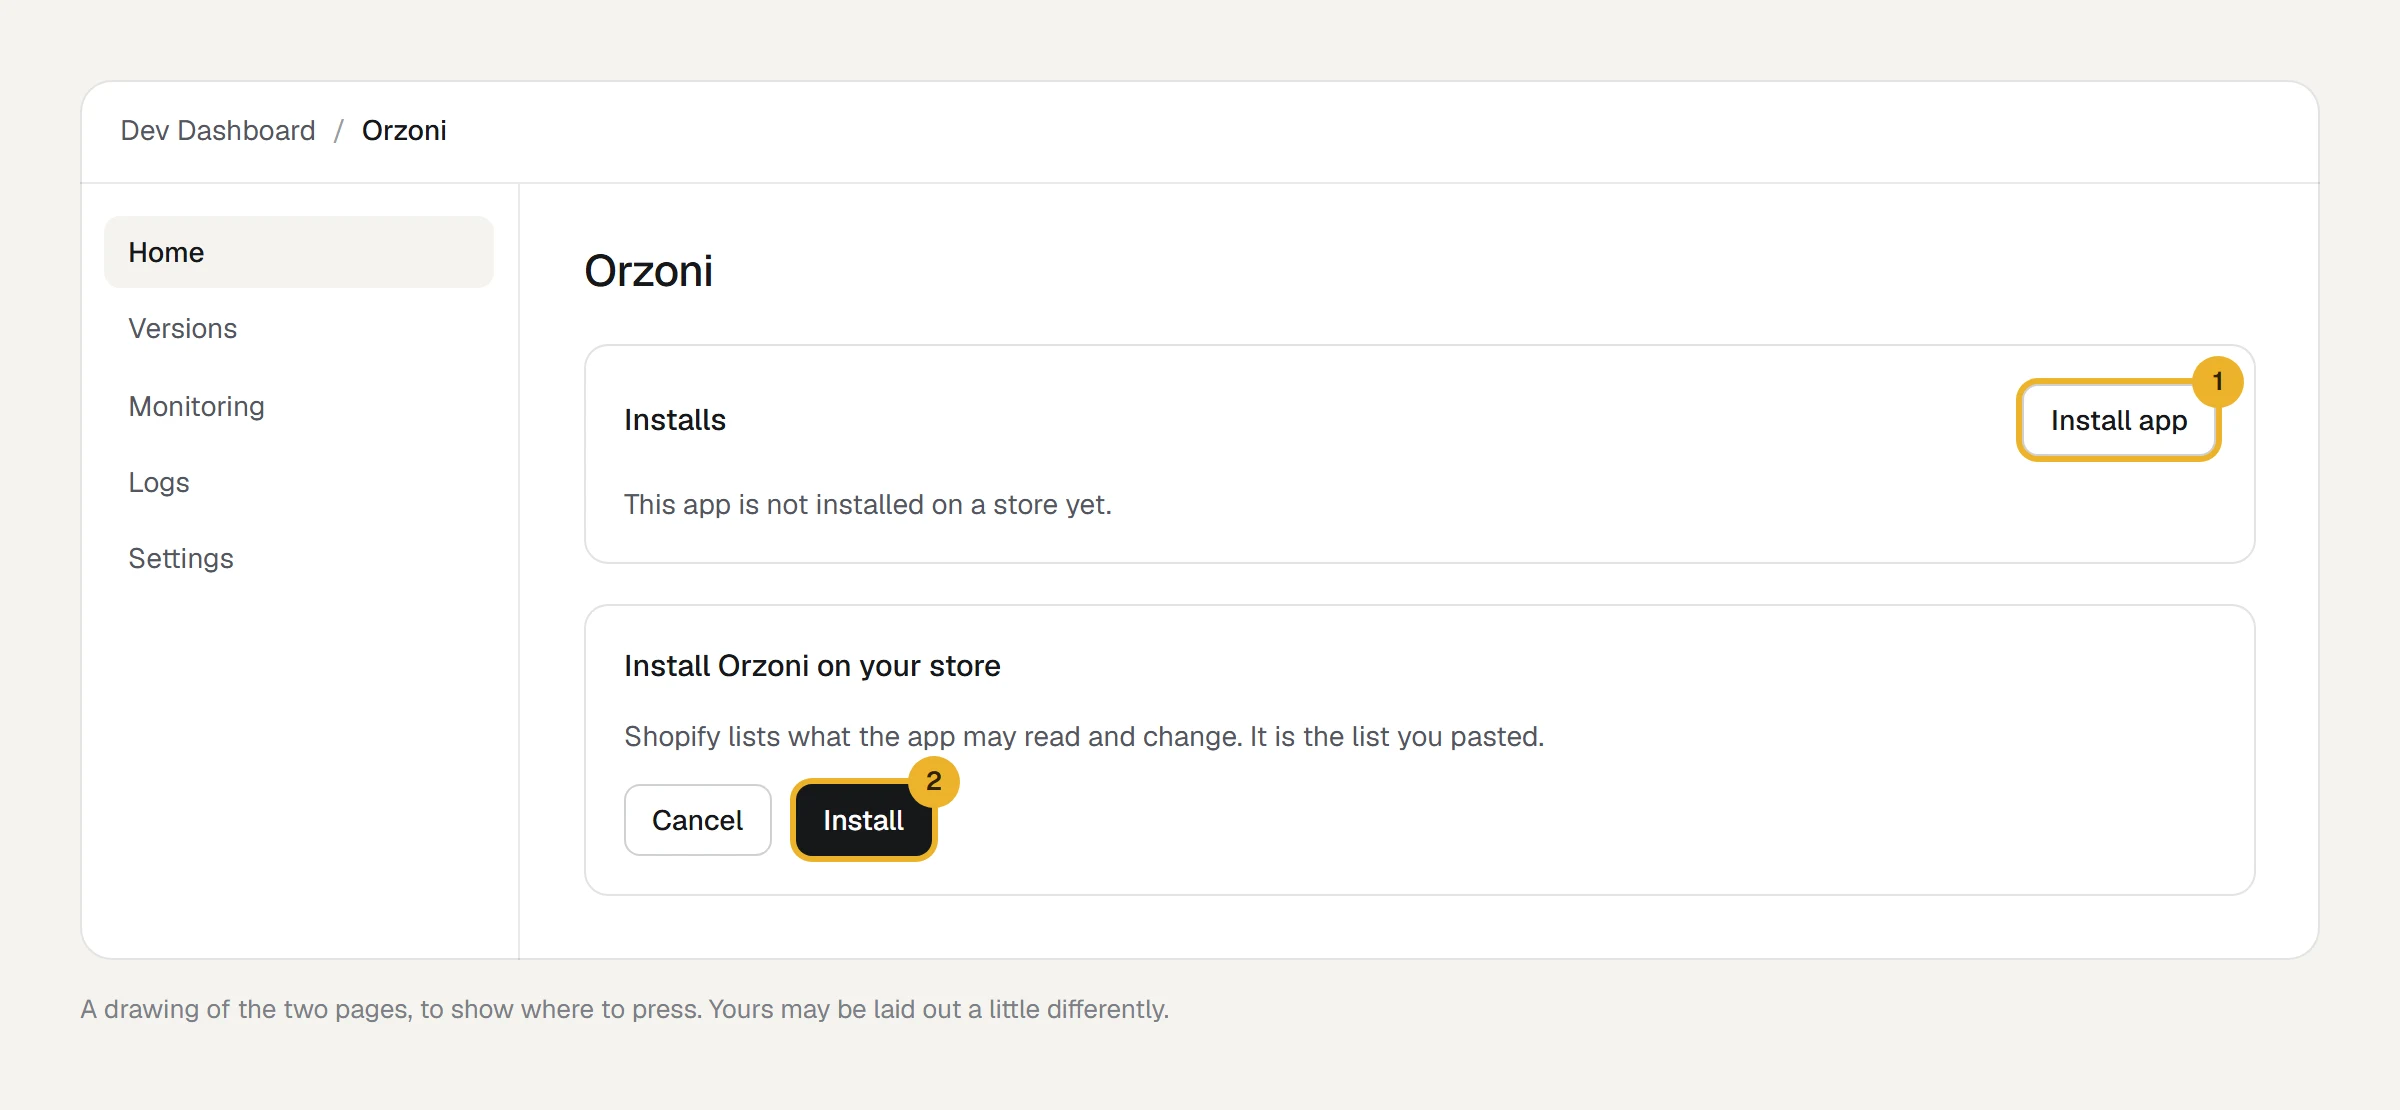
- Open the app's own page in the Dev Dashboard (its name in the list of apps, or Home in its side menu).
- In Installs, press Install app.
- If it asks which store, choose yours.
- Shopify lists what the app may read and change. It is the list you pasted. Press Install.
Step 5: paste the two codes into Orzoni
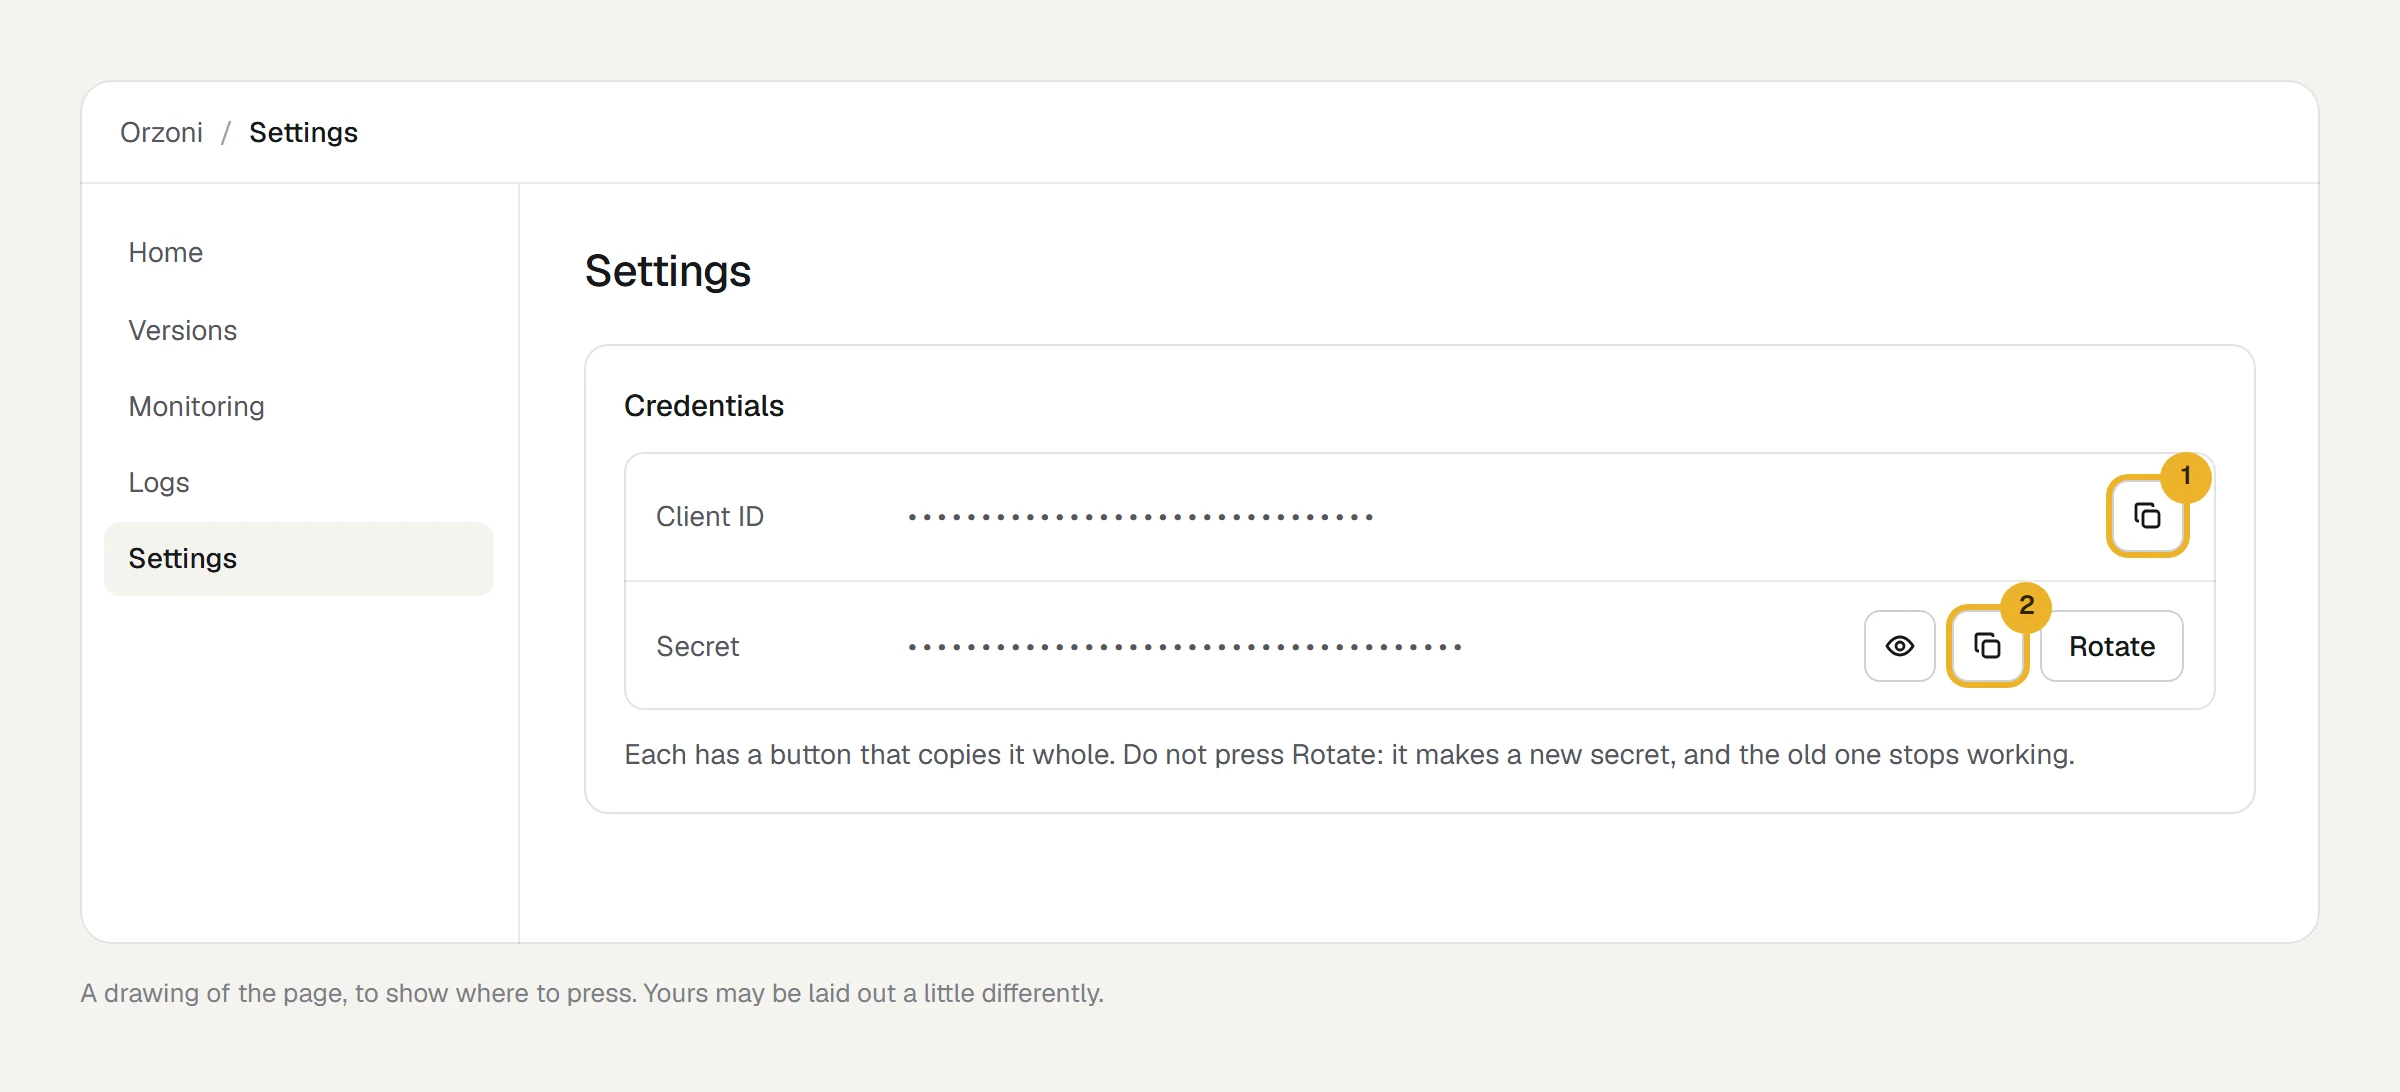
- In the app's side menu, open Settings.
- In Credentials, press the copy button beside Client ID.
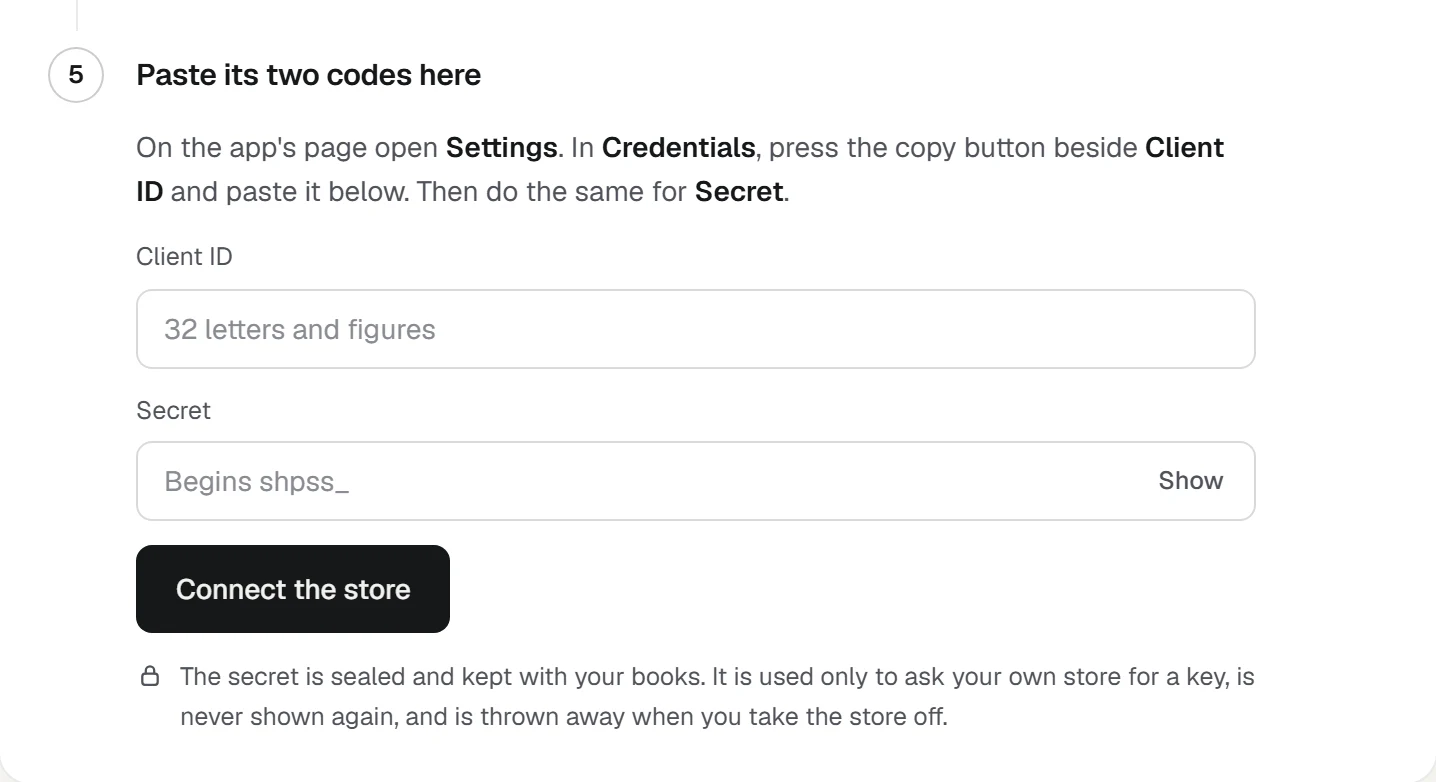
- In Orzoni, at step 5, paste it into Client ID.
- Back in the Dev Dashboard, press the copy button beside Secret.
- In Orzoni, paste it into Secret. It is hidden as you paste; press Show to check it.
- Check that Your store's address in step 1 is filled in, such as
your-store.myshopify.com. - Press Connect the store.
Orzoni asks your store for a key with the two codes. Shopify gives one only for an app that is installed on that store and belongs to the same owner, so this is also the proof that the store is yours. It takes a moment.
We set it up for you
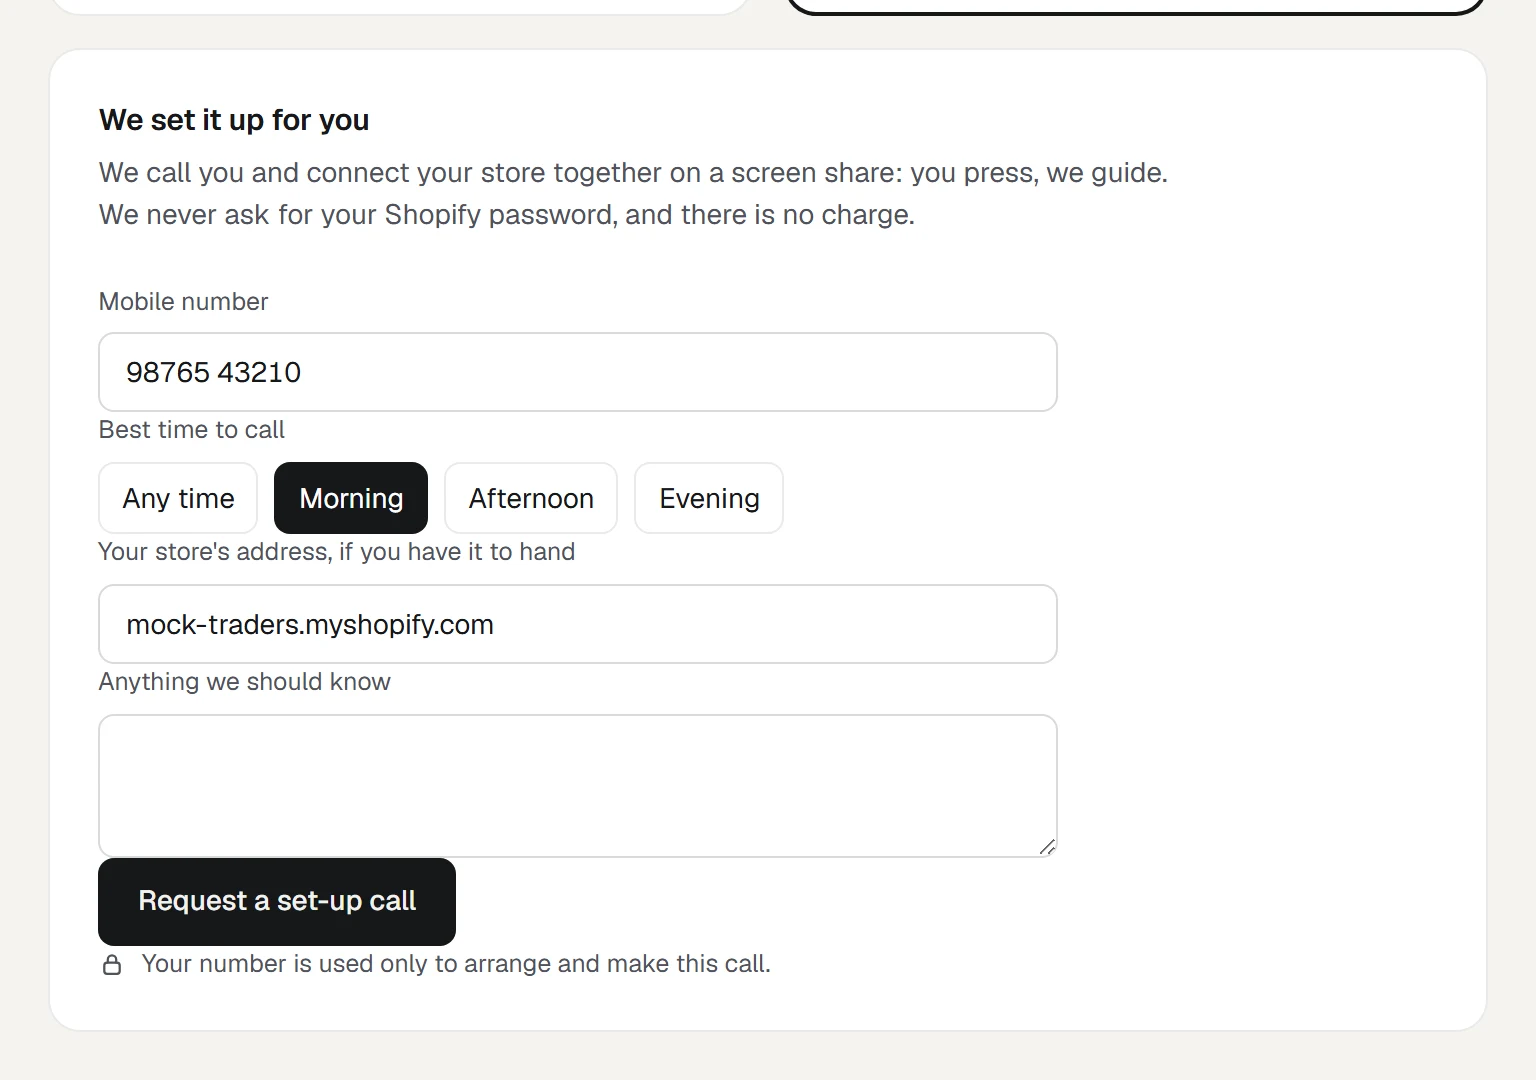
- In Orzoni, open Connectors, then Shopify, and choose We set it up for you.
- Type your mobile number.
- Choose the best time to call.
- Add your store's address if you have it to hand, and anything we should know.
- Press Request a set-up call.
The screen then says we will call you, and on which number.
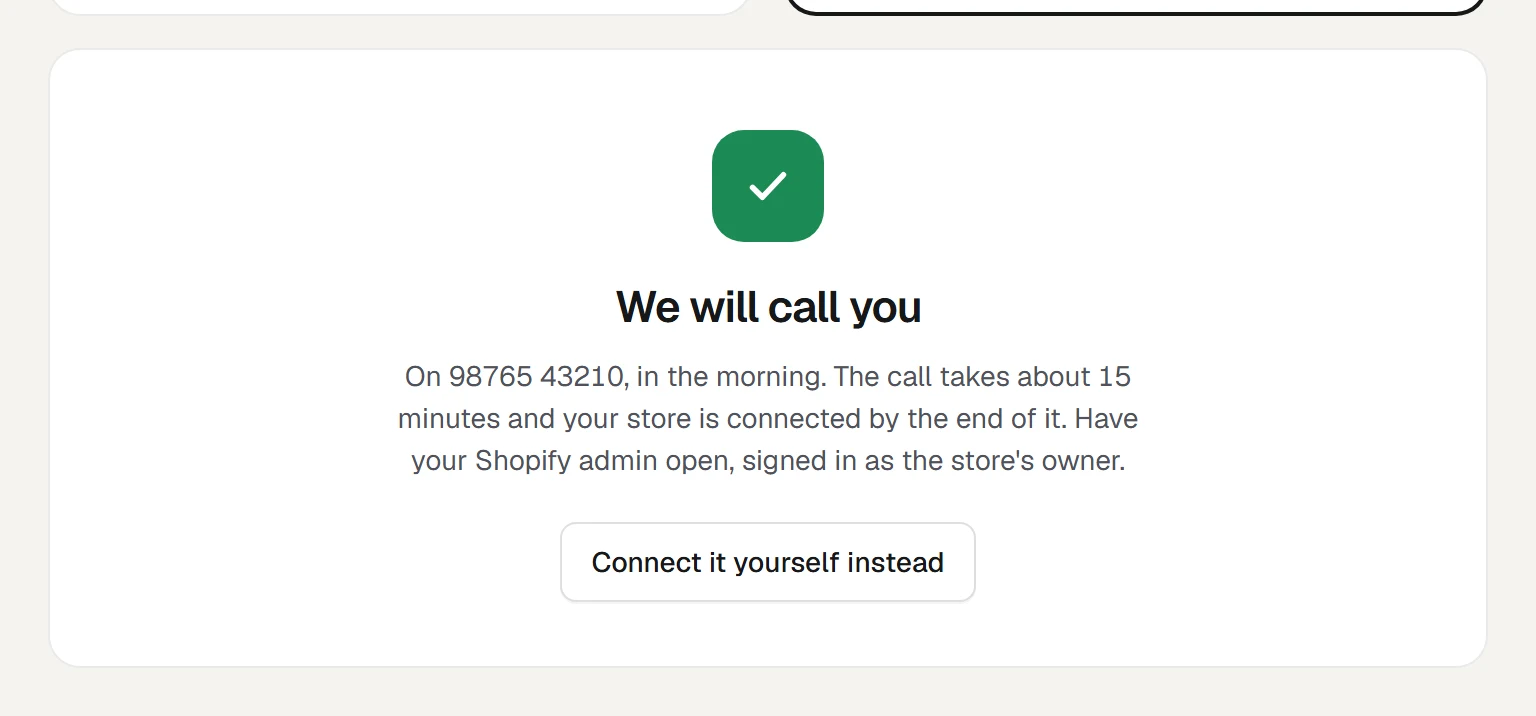
On the call we share screens and go through the five steps above together. You press; we guide. Have your Shopify admin open, signed in as the store's owner.
You can ask three times in a day. If you would rather not wait, choose Connect it yourself at any time: asking for a call does not stop you.
What happens next
The moment the store connects, Orzoni reads it: its name, where it keeps stock, and everything it lists with the count held for each. A large store takes a little longer.
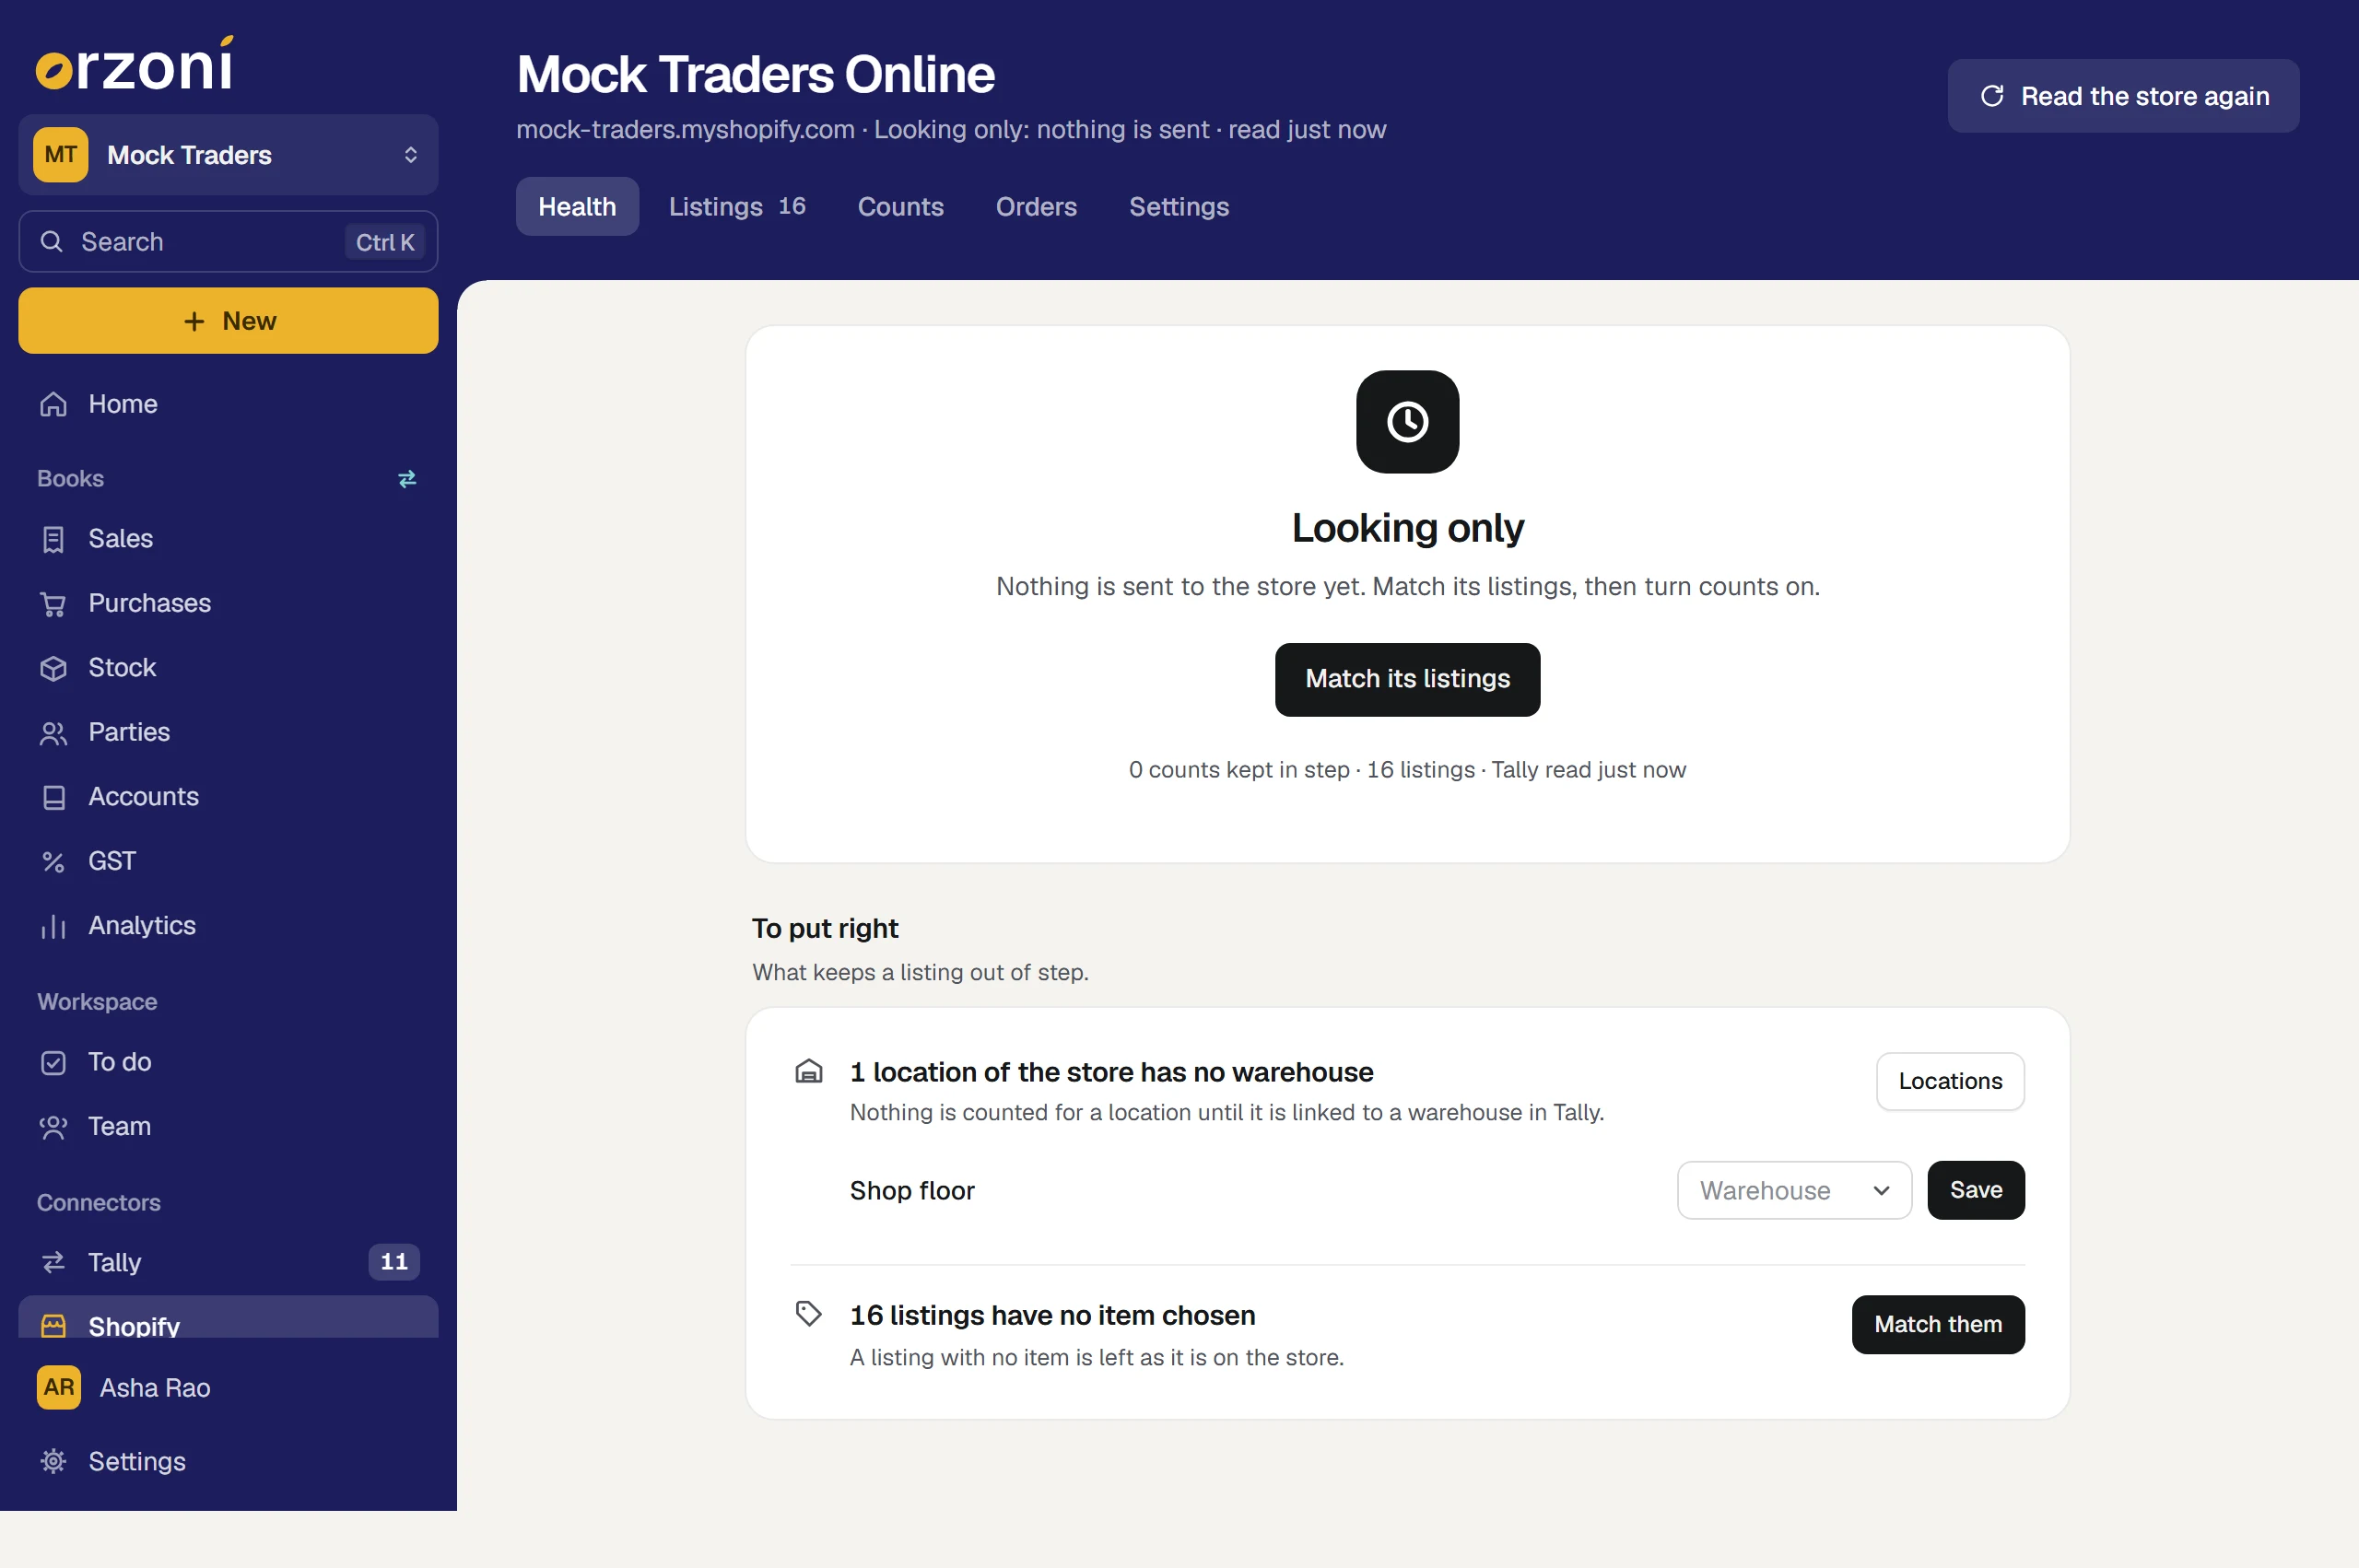
It starts as Looking only. Nothing is sent to your store yet. From here:
- Link each location to a warehouse. A store's location has no count until it is linked to a warehouse in Tally.
- Match its listings. Each listing is set beside the item it is in Tally. Where the code or the name agrees, Orzoni puts the match forward and you approve it.
- Look at the counts. Tally's count and the store's, side by side, with how each was worked out.
- Turn counts on. The first set of counts waits for you. You see exactly what would change before anything is sent.
Counts go one way only, from Tally to the store. An order on the store lowers the count at once, and waits under Orders for its bill.
If it does not connect
Orzoni says what went wrong under the box it is about.
| What Orzoni says | What it means | What to do |
|---|---|---|
| Enter the store's address | The address is not a store's | Use the one ending .myshopify.com. It is under Settings, Domains in Shopify |
| That does not look like a Client ID | Something else was pasted | Copy it again with the copy button beside Client ID. It is 32 letters and figures |
| That does not look like the app's Secret | Part of it is missing, or something else was pasted | Copy it again with the copy button beside Secret |
| Shopify did not accept that Client ID and Secret together | One of the two is from another app, or the Secret was rotated | Copy both again from the same app's Settings page |
| The app is not installed on this store yet | Step 4 was missed, or the app was made in another Shopify organisation | Install it on this store (step 4). If you have more than one organisation, make the app in the one your store is in |
| The app is not allowed everything Orzoni needs | Part of the list in step 3 is missing | Add what is named under Access in a new version, Release it, approve the change on your store, and try again |
| Those belong to another store | The codes are for an app installed on a different store | Type that store's address, or use the app installed on this one |
| That store is already connected to another Orzoni business | Someone else connected it first | It has to be taken off there before it can be connected here |
| This account covers one store | A store is already connected | Take that one off first, under its Settings |
| Too many tries at connecting a store | Twenty tries in an hour | Wait an hour, or ask for a set-up call |
Still stuck? Choose We set it up for you on the same screen, or write to support@orzoni.com with what the screen says.
How your codes are kept
- The Secret is sealed the moment it arrives and kept with your company's books on Orzoni. It is never shown again, to you or to anyone, and never sent back to a browser.
- It is used for one thing: asking your own store for a key. That key lasts a day, and Orzoni asks for a new one by itself.
- Orzoni asks your store only for what the list in step 3 allows. Of an order it reads the number, what was ordered and what was paid. It never reads who bought.
- Notices from your store (an order, a count changed there) are checked against your app's Secret before anything in them is read.
More on this in Your data.
Take the store off
- In Orzoni, open Connectors, Shopify, then Settings.
- Under Take the store off, press the button and confirm.
No count is changed on your store, and what you matched is kept in case you connect it again. Orzoni also takes the app off your store and throws the sealed Secret away.
To connect again, install the app on your store again (step 4), then paste its two codes (step 5). The app itself is still in your Dev Dashboard.
You can also take the app off from the Shopify side: under Settings, Apps in your Shopify admin, uninstall Orzoni. Shopify tells Orzoni, usually at once, and the store is shown as taken off.
Already connected
Nothing changes for you. When Orzoni's app is listed on Shopify, the Shopify screen offers a third way, approving it in one press.
Still stuck? Write to support@orzoni.com and say which step you are on, or book a walk-through call.